今回は画像生成AIのStable Diffusionを試してみたく、Windows11のWSL2でUbuntu22.04上にStable Diffusion WebUIを実装したので紹介します。
今回、ご紹介するStable Diffusion web UIはWindowsのローカル環境も直接実装することができるようですが、あまりWindows環境を汚したくないのでWSL2のUbuntu環境で実装することにします。
- Windows11(WLS2にてUbuntu22.04)
- CPU i7-12700F
- メモリ 16GB
- GPU NVIDIA GeForce RTX 3060Ti
- NVIDIA Driver 531.68
- Python 3.10
- nvidia-cuda-toolkit 11.5.1
Windows環境でWSL2でUbuntuを起動する方法はWindows11でWSL2のインストール方法についてをご覧ください。
事前準備

WindowsにNVIDIA GPUのドライバをインストール
こちらからNVIDIA GPUドライバをインストールします。

Windows側の準備はこれで完了です。後の作業はWSL2のUbuntu上で実施を行います。
UbuntuにNVIDIA CUDA Toolkitをインストール
WSL2で起動したUbuntuにnvidia-cuda-toolkitをインストールします。

ダウンロードは下記のように環境に合わせて選択します。
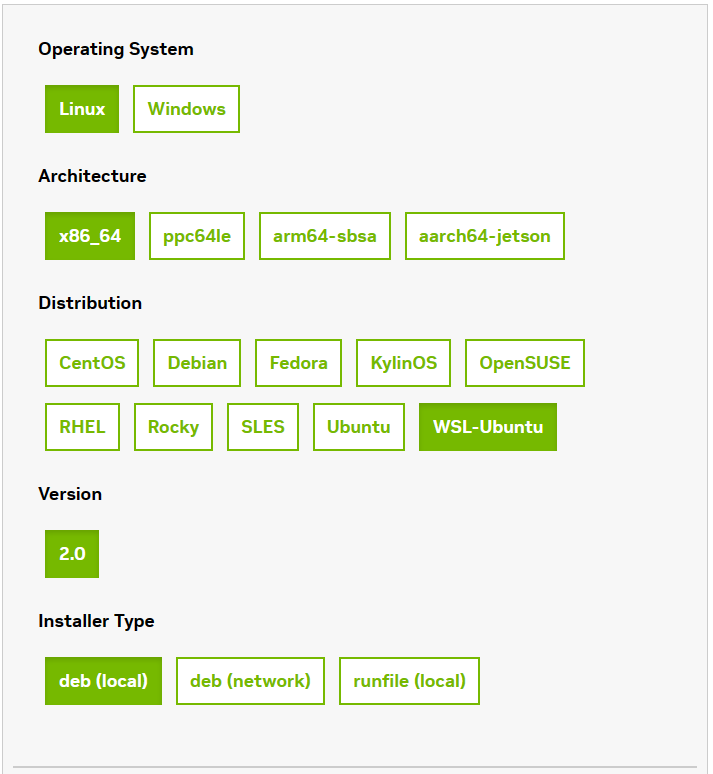
選択するとダウンロード用のコマンドが出てくるので、WSL2のUbuntu環境で実行します。
$ wget https://developer.download.nvidia.com/compute/cuda/repos/wsl-ubuntu/x86_64/cuda-wsl-ubuntu.pin
$ sudo mv cuda-wsl-ubuntu.pin /etc/apt/preferences.d/cuda-repository-pin-600
$ wget https://developer.download.nvidia.com/compute/cuda/12.1.1/local_installers/cuda-repo-wsl-ubuntu-12-1-local_12.1.1-1_amd64.deb
$ sudo dpkg -i cuda-repo-wsl-ubuntu-12-1-local_12.1.1-1_amd64.deb
$ sudo cp /var/cuda-repo-wsl-ubuntu-12-1-local/cuda-*-keyring.gpg /usr/share/keyrings/
$ sudo apt-get update
$ sudo apt-get -y install cuda
UbuntuにPythonのインストール
UbuntuにPythonをインストールします。
$ sudo apt install wget git python3 python3-venvパッケージの動作確認
nvidia-smiでドライバのインストール確認をします。
$ nvidia-smi
Tue Jun  6 22:36:44 2023
+---------------------------------------------------------------------------------------+
| NVIDIA-SMI 530.47                 Driver Version: 531.68       CUDA Version: 12.1     |
|-----------------------------------------+----------------------+----------------------+
| GPU  Name                  Persistence-M| Bus-Id        Disp.A | Volatile Uncorr. ECC |
| Fan  Temp  Perf            Pwr:Usage/Cap|         Memory-Usage | GPU-Util  Compute M. |
|                                         |                      |               MIG M. |
|=========================================+======================+======================|
|   0  NVIDIA GeForce RTX 3060 Ti      On | 00000000:01:00.0  On |                  N/A |
| 30%   36C    P8               16W / 200W|    909MiB /  8192MiB |     18%      Default |
|                                         |                      |                  N/A |
+-----------------------------------------+----------------------+----------------------+

+---------------------------------------------------------------------------------------+
| Processes:                                                                            |
|  GPU   GI   CI        PID   Type   Process name                            GPU Memory |
|        ID   ID                                                             Usage      |
|=======================================================================================|
|    0   N/A  N/A        23      G   /Xwayland                                 N/A      |
+---------------------------------------------------------------------------------------+
nvcc -VでCUDAの確認をします。
$ nvcc -V
nvcc: NVIDIA (R) Cuda compiler driver
Copyright (c) 2005-2021 NVIDIA Corporation
Built on Thu_Nov_18_09:45:30_PST_2021
Cuda compilation tools, release 11.5, V11.5.119
Build cuda_11.5.r11.5/compiler.30672275_0
python3 -Vでpythonの確認をします。
$ python3 -V
Python 3.10.6
問題なくインストールが完了したら、ようやくStable Diffusion webUIの実装です。
Stable Diffusionのインストール

git clone
git cloneでStable Diffusion web UIをダウンロードします。
$ git clone https://github.com/AUTOMATIC1111/stable-diffusion-webui.git
Cloning into 'stable-diffusion-webui'...
webui_user.shの編集
cloneしてきたstable-diffusion-webuiの中にwebui-user.shファイルがありますのでこちらを編集します。webui-user.shを開き13行目の部分を編集します。(#を消して、–xformersを記入)
#!/bin/bash
#########################################################
# Uncomment and change the variables below to your need:#
#########################################################

# Install directory without trailing slash
#install_dir="/home/$(whoami)"

# Name of the subdirectory
#clone_dir="stable-diffusion-webui"

# Commandline arguments for webui.py, for example: export COMMANDLINE_ARGS="--medvram --opt-split-attention"
export COMMANDLINE_ARGS="--xformers"

# python3 executable
#python_cmd="python3"

# git executable
#export GIT="git"

# python3 venv without trailing slash (defaults to ${install_dir}/${clone_dir}/venv)
#venv_dir="venv"

# script to launch to start the app
#export LAUNCH_SCRIPT="launch.py"

# install command for torch
#export TORCH_COMMAND="pip install torch==1.12.1+cu113 --extra-index-url https://download.pytorch.org/whl/cu113"

# Requirements file to use for stable-diffusion-webui
学習済みモデルをインストール
まずは適当な学習済みモデルをダウンロードします。
 $ cd ~/stable-diffusion-webui/models/Stable-diffusion/
wget https://huggingface.co/stabilityai/stable-diffusion-2-1-base/resolve/main/v2-1_512-ema-pruned.safetensors
Stable Diffusion WebUIの起動(webui.shの実行)
起動もインストールと同じコマンドになります。(初回はインストールを行い、起動するようになってます。)2回目以降はすぐに起動します。
$ cd ~/stable-diffusion-webui
$ ./webui.sh
--中略--
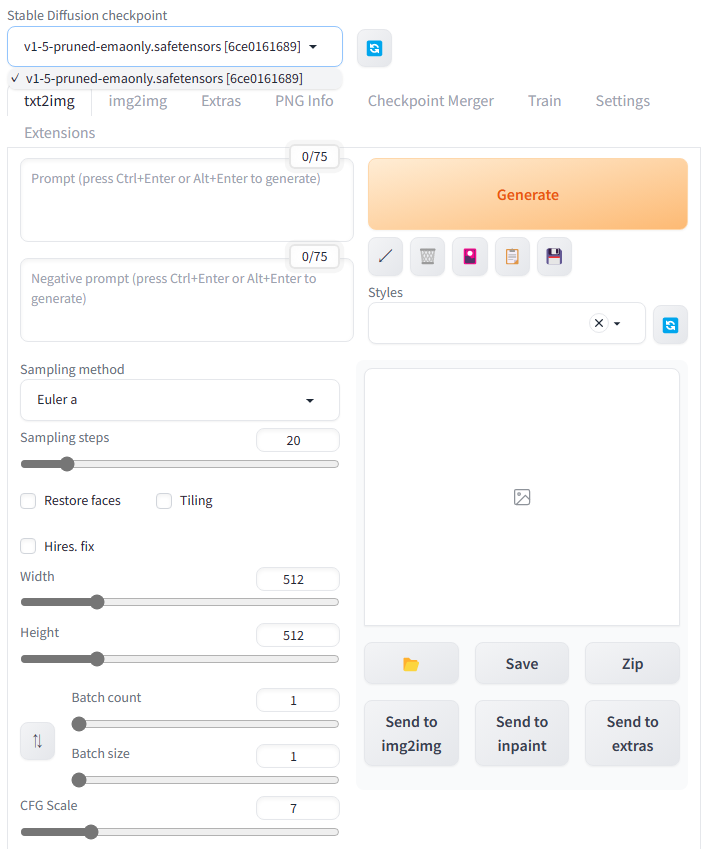
Running on local URL: http://127.0.0.1:7860表示されたアドレスをWebブラウザで開くと起動することができます。
実装エラー対応

実装する中でいくつかエラー等でハマったことがあったので実施した対処方法をまとめました。
紹介したインストール方法で失敗する場合は一度ご覧ください。

まとめ

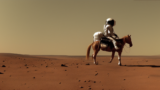
Windows画像生成AIのAUTOMATIC1111版のStable Diffusion web UIの実装を行いました。まずは動くようになったのでいろいろなモデルを試してみたいと思います。
実装時にいくつかハマったことがあったので同様のエラー症状等で困っている方の参考になれば幸いです。

コメント